今天开始在看Udacity上的TensorFlow入门课程,其中构建的第一个神经网络模型就是将摄氏度转换成华氏度,于是在这里记录一下
公式
已知摄氏度转换成华氏度有数学公式:
f = c * 1.8 + 32
而我们就要在不告知模型这个公式的前提下,通过告知一系列对应的摄氏度与华氏度样例,来训练它以实现摄氏度转华氏度这一功能
import dependencies 导入依赖项
需要引入TensorFlow与NumPy库构建神经网络
from __future__ import absolute_import, division, print_function, unicode_literals

import tensorflow as tf
import numpy as np
还需要引入logging以记录日志
import logging
logger = tf.get_logger() #返回tf的日志实例
logger.setLevel(logging.ERROR)
Set up training data 建立训练数据
由于在这里我们使用的是监督式机器学习,所以准备两组链表celsius_q和fahrenheit_a分别代表摄氏温度与对应华氏温度,用来训练模型
celsius_q = np.array([-40, -10, 0, 8, 15, 22, 38], dtype=float)
fahrenheit_a = np.array([-40, 14, 32, 46, 59, 72, 100], dtype=float)

for i,c in enumerate(celsius_q):
  print("{} degrees Celsius = {} degrees Fahrenheit".format(c, fahrenheit_a[i]))
输出:
-40.0 degrees Celsius = -40.0 degrees Fahrenheit
-10.0 degrees Celsius = 14.0 degrees Fahrenheit
0.0 degrees Celsius = 32.0 degrees Fahrenheit
8.0 degrees Celsius = 46.0 degrees Fahrenheit
15.0 degrees Celsius = 59.0 degrees Fahrenheit
22.0 degrees Celsius = 72.0 degrees Fahrenheit
38.0 degrees Celsius = 100.0 degrees Fahrenheit
一些机器学习术语:
- Feature(特征):模型的输入。在这里即摄氏度
- Labels(标签):模型的输出。在这里即华氏度
- Example(样本):训练期间数据集的一行内容,可以是标注样本(labeled example)和无标注样本(unlabeled example)。在这里即一对摄氏度与华氏度数据,为标注样本
Create the model 创建模型
由于问题比较简单,因此我们要建立的密集网络将只需要一个单层神经元
Build a layer 建立一个层
我们会把这一层叫做l0,并且使用 tf.keras.layers.Dense(全连接层)来建立
tf.keras.layers.Dense
-
units=1指定本层神经元数量。神经元的数量定义了本层需要有多少内部变量来学习解决这个问题。由于这是本模型的最后一层,因此它也代表模型输出的大小。(在多层神经网络中,该层的大小与形状需要与下一层的input_shape相匹配 -
input_shape=[1]指定本层输入值为单值。表明这是一个包含单个成员的一维数组。由于这是本模型的第一层(也是唯一一层),因此该输入形状也是整个模型的输入形状。单值是浮点数,即摄氏度
l0 = tf.keras.layers.Dense(units=1, input_shape=[1])
Assemble layers into the model 将Layer组装到模型中
定义了层之后,就要将它们组装成模型。Sequential model 顺序模型的定义需要以层列表作为参数,指定从输入到输出的计算顺序
model = tf.keras.Sequential([l0])
注意: 以上两步经常合并为一步操作,如
model = tf.keras.Sequential([ tf.keras.layers.Dense(units=1, input_shape=[1]) ])
Compile the model, with loss and optimizer functions 使用损失和优化器功能编译模型
搭好模型架构之后,在训练模型之前,还要执行编译操作。在编译时,经常需要指定三个参数:
-
Loss function一种衡量结果与预期相差多少的方法(测得的差异称为loss(损失)) -
Optimizer function一种调整内部值以减少损耗的方法 -
Metrics function(较复杂,此处不用,日后再看)
model.compile(loss='', optimizer=tf.keras.optimizers.Adam(0.1))
在训练过程中使用model.fit()来首先计算每个点的损耗,之后对其改善。优化器功能用于计算对模型内部变量的调整,目的是调整内部变量直到模型(实际是一个数学函数)接近将摄氏度转换为华氏度的公式为止
这里使用的优化函数mean_squared_error(均方误差)和优化器Adam是这种简单模型的标准配置,实际还有其他可用配置。
在建立自己的模型时,我们需要考虑的Optimizer优化器的部分是学习率(即上式中的0.1),这是在模型中调整值时采取的步长,它决定着目标函数能否收敛到局部最小值以及何时收敛到最小值。合适的学习率能够使目标函数在合适的时间内收敛到局部最小值。范围通常在0.001(默认)和0.1之间
Train the model 训练模型
在训练过程中,模型输入摄氏温度,使用当前的内部变量(权重)执行计算,并输出相应华氏温度的值。 由于权重最初是随机设置的,因此输出并不会接近正确的值。实际输出与期望输出之间的差值通过损失函数计算,而优化器函数将指导如何调整权重。
计算,比较,调整的整个流程由fit方法进行控制。 它的第一个参数是输入,第二个参数是期望的输出结果。epochs参数指定模型应运行此循环多少次,而verbose参数控制该方法的日志显示。
history = model.fit(celsius_q, fahrenheit_a, epochs=500, verbose=False) #fit方法返回History对象
print("Finished training the model")
输出:
Finished training the model
verbose参数
- 默认为1
- verbose = 0 为不在标准输出流输出日志信息
- verbose = 1 为输出进度条记录
- verbose = 2 为每个epoch输出一行记录
History对象
可以由fit()方法返回。History.history属性是一个记录了连续迭代的训练/验证(如果存在)损失值和评估值的字典。可以利用该对象实现训练历史可视化
Display training statistics 展示训练统计数据
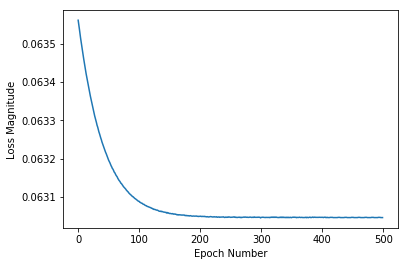
由于fit会返回一个History对象,因此我们可以使用该对象来绘制每个训练时期后模型损失的下降趋势。若为高损耗则意味着模型预测的华氏度与fahrenheit_a中的期望值相去甚远。
使用Matplotlib进行绘制
import matplotlib.pyplot as plt
plt.xlabel('Epoch Number') #x坐标轴
plt.ylabel("Loss Magnitude") #y坐标轴
plt.plot(history.history['loss']) #标点
plt.show()
结果:

可见,我们的模型起初改进非常快,然后有了稳定而缓慢的改进,直到最终接近“完美”为止。
Use the model to predict values 使用模型预测数值
至此,我们已经拥有了一个可以利用摄氏度获得华氏度的模型。我们可以利用它计算先前未知的摄氏温度
print(model.predict([100.0])) #向模型输入100.0
输出:
[[211.74744]]
而我们通过公式可以得到:
100*1.8 + 32 = 212
由此可见,我们的模型得到的结果已经非常接近真实答案
To review 回顾
- 我们创建了一个含有单层神经元的模型
- 将模型训练了3500次(7对数据,500轮)
我们的模型调整了Dense层中的变量(权重),直到它能够为任何摄氏值返回正确的华氏温度值
l0 = tf.keras.layers.Dense(units=1, input_shape=[1])
model = tf.keras.Sequential([l0])
model.compile(loss='mean_squared_error', optimizer=tf.keras.optimizers.Adam(0.1))
history = model.fit(celsius_q, fahrenheit_a, epochs=500, verbose=False)
model.predict([100.0])
Looking at the layer weights 查看Layer权重
最后我们打印Dense层的内部变量
print("These are the layer variables: {}".format(l0.get_weights())) #以包含Numpy矩阵的列表形式返回层的权重
输出:
These are the layer variables: [array([[1.7979496]], dtype=float32), array([31.952478], dtype=float32)]
这里的第一个变量1.7979496接近于1.8,第二个变量31.952478接近于32,而这两个值也是实际的转换公式中的两个变量
对于只有单个输入和单个输出的单神经元,它内部看起来与直线方程相同,即y=mx+b,因此我们的模型能够如此逼近转换公式
而有了额外的神经元,额外的输入和额外的输出,公式会变得更加复杂,但是思路是一样的。
A little experiment 小实验
如果我们创建多个含不同数量神经元的层,会是怎样的结果呢?
l0 = tf.keras.layers.Dense(units=4, input_shape=[1])
l1 = tf.keras.layers.Dense(units=4)
l2 = tf.keras.layers.Dense(units=1)
model = tf.keras.Sequential([l0, l1, l2])
model.compile(loss='mean_squared_error', optimizer=tf.keras.optimizers.Adam(0.1))
model.fit(celsius_q, fahrenheit_a, epochs=500, verbose=False)
print("Finished training the model")
print("Model predicts that 100 degrees Celsius is: {} degrees Fahrenheit".format(model.predict([100.0])))
print("These are the l0 variables: {}".format(l0.get_weights()))
print("These are the l1 variables: {}".format(l1.get_weights()))
print("These are the l2 variables: {}".format(l2.get_weights()))
输出:
Finished training the model
Model predicts that 100 degrees Celsius is: [[211.74742]] degrees Fahrenheit #得到预测结果仍然与实际相近
These are the l0 variables: [array([[-0.52520204, -0.25983605,  0.27832836,  0.11471745]],
      dtype=float32), array([-3.468158 , -3.3907545,  3.5017395,  2.1893277], dtype=float32)]
These are the l1 variables: [array([[-0.37798777,  0.6455525 ,  0.7230809 ,  0.3954812 ],
       [-0.85110897,  0.6376249 ,  0.31107017, -0.70929325],
       [-0.534542  , -0.980425  , -0.92369473,  0.72322994],
       [ 0.38675487,  0.41835558, -0.24832523, -0.08700816]],
      dtype=float32), array([ 3.2148993, -3.1253922, -3.340591 ,  3.433869 ], dtype=float32)]
These are the l2 variables: [array([[ 0.74975073],
       [-0.56715256],
       [-1.4492323 ],
       [ 0.39553005]], dtype=float32), array([3.2948794], dtype=float32)]
可以看到,模型仍然能很好的得到结果,但其中的变量早已不接近1.8或32,这是因为多层Layer带来的复杂度隐藏了转换方程的“简单”形式